Learn how to use FCM to receive Push notifications on Ionic Framework
FCM (or Firebase Cloud Messaging) is an excellent way to keep our users engaged with our app, and it also helps them by notifying them of important things that are happening.
We’ll go through how to setup the FCM Cordova Plugin to work with your Firebase app and handle the data from arriving notifications when the user taps on it on the phone.
FCM Plugin SET UP
The first thing we need to do is install the FCM plugin:
ionic cordova plugin add cordova-plugin-fcm
npm install --save @ionic-native/fcm
Now go into your app.module.ts file and import FCM and add it to the providers array:
import { FCM } from '@ionic-native/fcm';
@NgModule({
  imports: [...],
  providers: [
    ...,
    FCM
  ]
})
Go into your Firebase Console, and you will find in the Overview section a box that lets you add a new app to Firebase, it has three choices, Android, iOS, and the web.

You are going to click on a new Android app, and it will open a dialog box like the one below, asking you for some information:
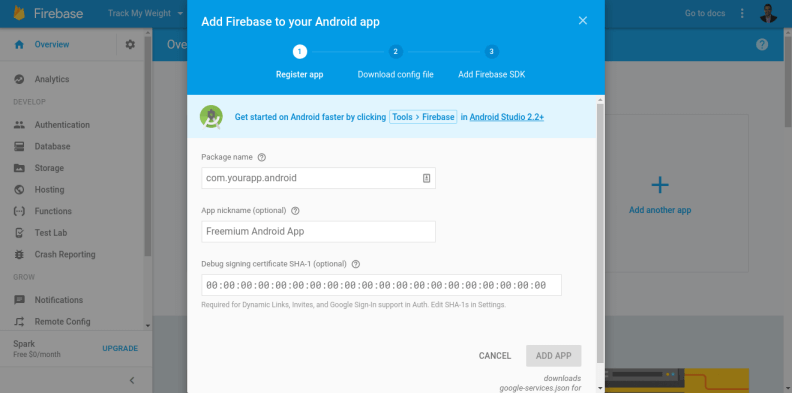
All you need to care about to get your app to work is the package name. You need to add the package name, you can find
yours inside the config.xml file:

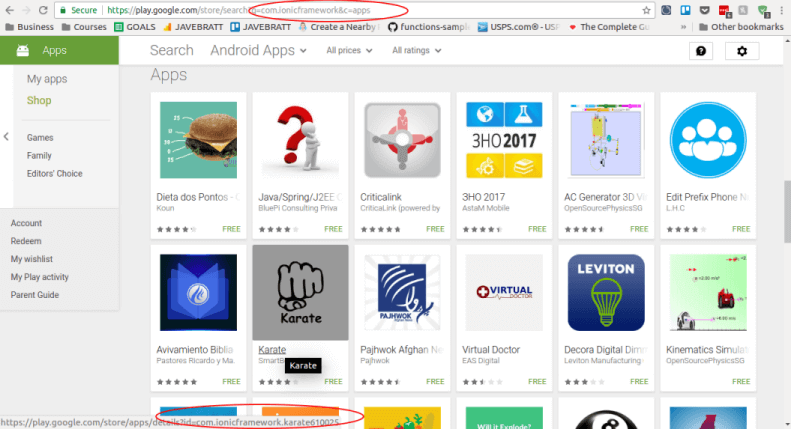
Yours is probably something like com.ionicframework.trackmyweight7954 or something like that, please, change it,
always make it a step on your checklist to replace the package name for something custom to your business.
There are too many people forget this, if you do not believe me, go to Google Play and search for com.ionicframework
Once you change it, add it to the Android config box in the Firebase console, it will let you go to the next page, where
you can download the config file, that is what we came here for, you are going to download the google-services.json
file and place it in your projects root folder, next to files like config.xml or package.json
After you copy that file to the project it is time to do the same for iOS, you’re going to add your package name, and
Firebase will let you download the file, this file is called GoogleService-Info.plist. Download it and then place it
right where you placed it the other one, in your projects root folder.
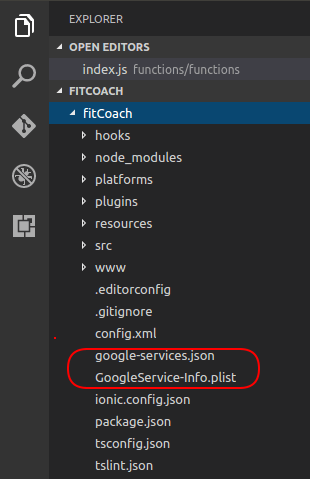
Once the files are in the root folder of your project, we can move on and start coding :)
Getting the Device Token
We need to get the device token. It is a unique token that identifies the device so that FCM knows whom to send our notifications.
There are a few places where you can get the token, but for this tutorial, we’ll get it on app load.
Open your app.component.ts file and import the FCM plugin
import { FCM } from '@ionic-native/fcm';
Inject it into the constructor:
constructor(private fcm: FCM) {}
Next thing is to find the platform ready call inside the constructor and get the token there, inside the platform.ready add:
this.fcm.getToken().then(token => {
  // Your best bet is to here store the token on the user's profile on the
  // Firebase database, so that when you want to send notifications to this
  // specific user you can do it from Cloud Functions.
});
We’re using the .getToken() function of the FCMPlugin, it will return a promise with the token for that device, then
inside of that promise you can pass that token to Firebase so we can make sure it is in the database when the Cloud
Function tries to read it to send the notification.
Now that we have the device token, we need to handle the incoming notifications, and the idea is that we place the function in a file that’s always getting called on startup, that way we can call that function when the user enters the app through the notification.
For that, we are going to set it in the app.component.ts file, so let’s break down the process of that we will do:
- We will receive the notification.
- Then the plugin will check if the notification has a property called tapped and that is equal to true or false.
- If it is
falseit means that the app was in the foreground (meaning the user was inside the app at that moment) - If it is
trueit means the user tapped the notification from the notification tray and that’s how he opened the app. - We’re also going to receive a profile ID on the notification, this as an example, let’s say you have a list of bird profiles and the notification has the ID of one of them when you tap the notification we want to go directly to that page.
We are going to set the notification listener. The FCMPlugin has a function called .onNotification that returns a
Promise carrying the notification data.
Since we’re using Ionic Native we can subscribe to that response:
constructor(..., private fcm: FCM) {
  ...
  ...
  ...

  platform.ready().then(() => {
    fcm.onNotification().subscribe( data => {
      if(data.wasTapped){
        //Notification was received on device tray and tapped by the user.
      }else{
        //Notification was received in foreground. Maybe the user needs to be notified.
      }
    });
  });
}
We are running it inside platform.ready() because it is a cordova plugin, we need to make sure the device is ready
before calling it, or it will crash. The plugin is listening for notifications, and when it finds one, it returns its
data as a promise.
Then we ask if the data has a property called wasTapped and if that property is true if it is, the app was in the
background and the user tapped the notification to get in.
If it is false, it means the user was using the app, in both cases, we are going to send the user to the DetailPage.
I am going to do the push in one line, but I want to leave a little challenge for you (don’t worry, it is an easy one).
Check when the user is in the foreground, meaning he is using the app and notify them that you are taking them there before navigating.
fcm.onNotification().subscribe(data => {
  if (data.wasTapped) {
    //Notification was received on device tray and tapped by the user.
    console.log(JSON.stringify(data));
    this.router.navigateByUrl(`detail/${data.profileId}`);
  } else {
    //Notification was received in foreground. Maybe the user needs to be notified.
    // Here you should add an alert or something that let's the user know
    // you're about to take them to another page
    this.router.navigateByUrl(`detail/${data.profileId}`);
  }
});
And there you have it. The notification system is ready to be used, and now we need to start sending notifications, you can test your notifications from a test server created by the plugin creator, it is kind of cool.