Learn how to use the new Inline Modals in Ionic 6
Ionic 6 introduced a new way to create modals, the ion-modal element.
According to the docs, ion-modal can be used by writing the component directly in your template.
This reduces the number of handlers you need to wire up in order to present the modal.
One great use case I found for this is when you’re sharing a service instance.
For example, let’s say you have a parent component, and that component has a service provider declared as a component provider.
If you use the old way to trigger modals, you´d have to declare the service in the modal provider or in root to be able to use it in the modal, but if you declare it in the modal provier, it would be a different instance that in the parent component.
To use them, you would use the <ion-modal> element directly in your template instead of using the
ModalController inside of your class to call a separate component.
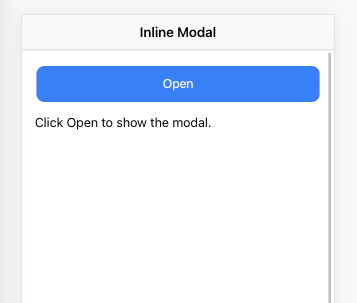
<ion-content class="ion-padding">
  <ion-button id="open-modal" expand="block">Open</ion-button>

  <ion-modal trigger="open-modal">
    <ng-template> </ng-template>
  </ion-modal>
</ion-content>
As you see, we use the <ion-modal> element with the trigger="open-modal" attribute, and we have
a button with the same ID, this button will open our modal.
And inside of the <ng-template> you can add another component, or directly add your elements there
so that they can be rendered on the modal.
For example:
<ion-modal #modal trigger="open-modal">
  <ng-template>
    <ion-header>
      <ion-toolbar>
        <ion-title>Confirm Your Details</ion-title>
      </ion-toolbar>
    </ion-header>
    <ion-content class="ion-padding">
      <p>
        Click <strong>confirm</strong> to set your name (Jorge) and age (36) or
        <strong>cancel</strong> to dismiss this modal.
      </p>
      <ion-button class="ion-margin" shape="round" expand="full" fill="outline" (click)="dismiss()"
        >Cancel</ion-button
      >
      <ion-button class="ion-margin" shape="round" expand="full" (click)="confirm()"
        >Confirm</ion-button
      >
    </ion-content>
  </ng-template>
</ion-modal>
Here we have a simple template that is showing some text, a cancel and confirm button, the idea is that those buttons cal some functions on the template.
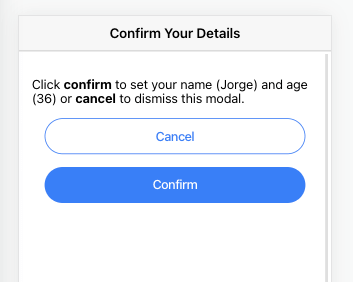
The cancel button will call the dismiss function, that dismisses the modal, and the confirm button will dismiss the modal, but passing some information back to the parent component/page.
import { Component, ViewChild } from '@angular/core';
import { IonModal } from '@ionic/angular';

@Component({
  selector: 'app-home',
  templateUrl: 'home.page.html',
  styleUrls: ['home.page.scss'],
})
export class HomePage {
  @ViewChild(IonModal) modal: IonModal;
  message = `Click Open to show the modal.`;

  dismiss() {
    this.modal.dismiss(null, 'dismiss');
  }

  confirm() {
    const person: Person = {
      name: 'Jorge Vergara',
      age: 36,
    };
    this.modal.dismiss(person, 'confirm');
  }
}

interface Person {
  name: string;
  age: number;
}
We’re using IonModal from import { IonModal } from '@ionic/angular'; and calling the dismiss()
function, this function takes 2 parameters, an object that you can use as data passed back to the
parent component, and a role.
Now to access that data, we’re going to create a new function called onWillDismiss() and assign it
to the willDismiss method of the modal:
<ion-modal trigger="open-modal" (willDismiss)="onWillDismiss($event)"></ion-modal>
onWillDismiss(modalEvent: Event) {
const customModalEvent = modalEvent as ModalCustomEvent;
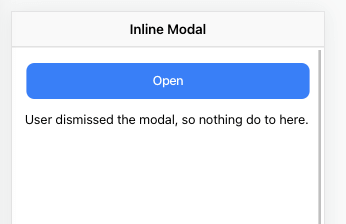
if (customModalEvent.detail.role === 'dismiss') {
this.message = `User dismissed the modal, so nothing do to here.`;
}
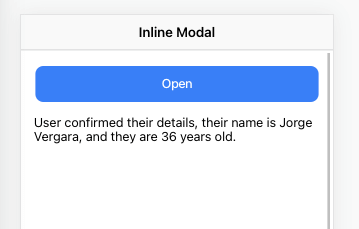
if (customModalEvent.detail.role === 'confirm') {
const { name, age } = customModalEvent.detail.data;
this.message = `User confirmed their details, their name is ${name}, and they are ${age} years old.`;
}
}
We’re getting the event, and from that event we’re accessing the detail property, there we have
both the data and the role.
If the role is dismiss we don’t do anything, because we see the user canceled the modal, of the
rol is confirm we do whatever logic we were going to do, in out case it’s showing a different
message.
And we created a ModalCustomEvent interface to properly type the returning data:
interface ModalCustomEvent extends CustomEvent {
  target: HTMLIonModalElement;
  detail: {
    data: Person,
    role: string,
  };
}
Another thing we can do is to change the way our modal looks, and transform it into a card modal by
changing the presentingElement.

<ion-modal [presentingElement]="presentingElement"></ion-modal>
import { IonRouterOutlet } from '@ionic/angular';

@Component({
  selector: 'app-home',
  templateUrl: 'home.page.html',
  styleUrls: ['home.page.scss'],
})
export class HomePage {
  presentingElement = this.ionRouterOutlet.nativeEl;
  constructor(private readonly ionRouterOutlet: IonRouterOutlet) {}
}
And that’s it, have you created inline modals yet? Do you find them easier to create than regular controller modals?
You can find the full source code for this example in Github