Building a CRUD Ionic application with Firestore
Firestore is Firebase’s default database. It’s a managed NoSQL document-oriented database for mobile and web development.
It’s designed to store and sync app data at global scale easily. Some of its key features include:
- Documents and Collections with powerful querying.
- Offline access to the WEB SDK.
- Real-time data sync.
Today we’re going to learn how to integrate Firestore with Ionic to create a CRUD work-flow. This sample app will show you how to:
- Showing a list of items from your database (which in Firestore is called displaying a collection of documents).
- Creating a new item and adding it to the list.
- Navigating to that item’s detail page.
- Deleting an item from our list.

We will break down this process in 5 steps:
- Step #1: Create and Initialize our Ionic app.
- Step #2: Add items to the list.
- Step #3: Show the list of items.
- Step #4: Navigate to one item’s detail page.
- Step #5: Delete an item from the list.
Now that we know what we’re going to do let’s jump into coding mode.
Step #1: Create and Initialize your app
The goal of this step is to create your new Ionic app, and initialize Firebase.
With that in mind, let’s create our app first, open your terminal and navigate to the folder you use for coding (or anywhere you want, for me, that’s the Development folder) and create your app:
cd Development/
ionic start
This will open a prompt that will ask you a few questions to create your app, like the app’s name, the template to use, and the programming framework, we’ll use Angular.
Once we create our app, we’ll navigate to the root folder of the application, and use the ng add
schematic to set up angularfire.
ng add @angular/fire
This will open a prompt and start asking questions for you to answer, things like:
- Picking which Firebase project to use.
- Picking which app inside the project (in case you have many)
- Creating a new app (or even a new project)
- Which Firebase APIs you’ll want to use (Authentication, Firestore, Hosting, etc.)
Once you’re done choosing, it will update your Ionic application, adding the Firebase credentials,
all of the initialization code to the app.module.ts file, and all the firebase configuration
files.
And that’s it, it might not look like much yet, but our Firebase and Ionic apps can now talk to each other.
Step #2: Add items to the list
It’s time to start working with our data, we’re going to build a CRUD app, we’ll use a song list as an example, but the same principles apply to any Master/Detail work-flow you want to build.
The first thing we need is to understand how our data is stored, Firestore is a document-oriented NoSQL database.
It means that we have two types of data in our database, documents, which are objects we can work with, and collections which are the containers that group those objects.
For example, if we’re building a song database, our collection would be called songs, or
songList, which would hold all the individual song objects, and each object would have its
properties, like the song’s name, artist, etc.
In our example, the song object will have five properties, an id, the album, the artist, a description, and the song’s name. In the spirit of taking advantage of TypeScript’s type-checking features, we’re going to create an interface that works as a model for all of our songs.
Go into the src/app folder and create a folder called models, then add a file called
song.interface.ts and populate it with the following data:
export interface Song {
  id: string;
  albumName: string;
  artistName: string;
  songDescription: string;
  sonName: string;
}
That’s the song’s interface, and it will make sure that whenever we’re working with a song object, it has all the data it needs to have.
To start creating new songs and adding them to our list we need to have a page that holds a form to input the song’s data, let’s create that page with the Ionic CLI, open the terminal and type:
ionic generate page pages/create
In fact, while we’re at it, let’s take a moment to create the detail page, it will be a detail view for a specific song, and the Firestore service, it will handle all of the database interactions so that we can manage everything from that file.
ionic generate page pages/detail
ionic generate service services/data/firestore
Before we start adding code, we need to fix our routes, if you go to the file
app-routing.module.ts you’ll see your application routes:
import { NgModule } from '@angular/core';
import { PreloadAllModules, RouterModule, Routes } from '@angular/router';

const routes: Routes = [
  {
    path: 'home',
    loadChildren: () => import('./home/home.module').then(m => m.HomePageModule),
  },
  {
    path: '',
    redirectTo: 'home',
    pathMatch: 'full',
  },
  {
    path: 'create',
    loadChildren: () => import('./pages/create/create.module').then(m => m.CreatePageModule),
  },
  {
    path: 'detail',
    loadChildren: () => import('./pages/detail/detail.module').then(m => m.DetailPageModule),
  },
];

@NgModule({
  imports: [RouterModule.forRoot(routes, { preloadingStrategy: PreloadAllModules })],
  exports: [RouterModule],
})
export class AppRoutingModule {}
We want to edit the route for our detail page so that the URL takes a parameter, the song’s ID so that we can fetch the song from Firestore:
{
  path: 'detail/:id',
  loadChildren: () => import('./pages/detail/detail.module').then(m => DetailPageModule),
},
Now we need a way to go from the home page to the CreatePage, for that open home.html and change
your header to look like this:
<ion-header>
  <ion-toolbar>
    <ion-title>Song List</ion-title>
    <ion-buttons slot="end">
      <ion-button routerLink="/create">
        <ion-icon slot="icon-only" name="add"></ion-icon>
      </ion-button>
    </ion-buttons>
  </ion-toolbar>
</ion-header>
We’re adding a button to the header that triggers the angular router and navigates to the create page.
Now that we can navigate to the create page, let’s add the functionality there, go ahead and open
the create.page.html file and inside the <ion-content></ion-content> tags create the form:
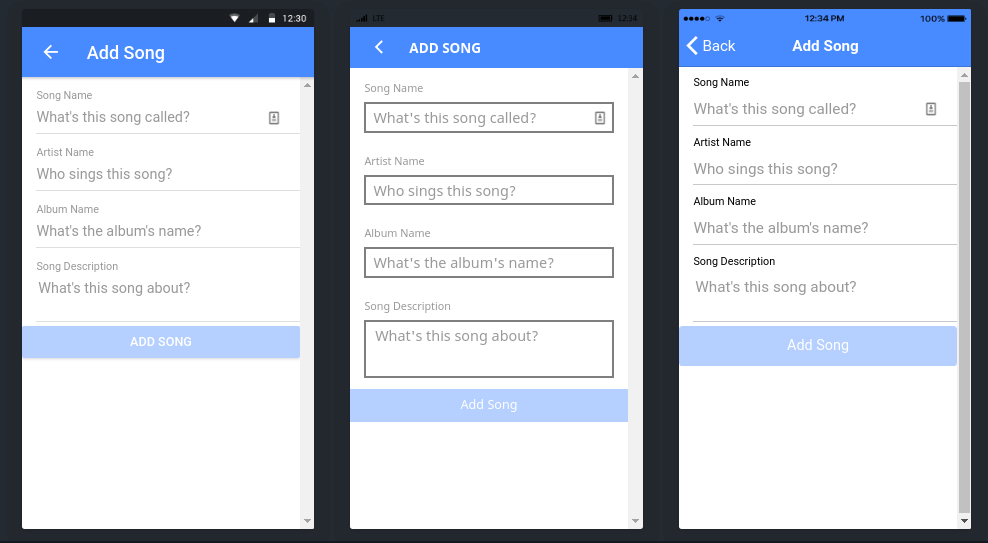
<ion-content padding>
  <form [formGroup]="createSongForm" (submit)="createSong()">
    <ion-item>
      <ion-label stacked>Song Name</ion-label>
      <ion-input formControlName="songName" type="text" placeholder="What's this song called?">
      </ion-input>
    </ion-item>

    <ion-item>
      <ion-label stacked>Artist Name</ion-label>
      <ion-input formControlName="artistName" type="text" placeholder="Who sings this song?">
      </ion-input>
    </ion-item>

    <ion-item>
      <ion-label stacked>Album Name</ion-label>
      <ion-input formControlName="albumName" type="text" placeholder="What's the album's name?">
      </ion-input>
    </ion-item>

    <ion-item>
      <ion-label stacked>Song Description</ion-label>
      <ion-textarea
        formControlName="songDescription"
        type="text"
        placeholder="What's this song about?"
      >
      </ion-textarea>
    </ion-item>

    <ion-button expand="block" type="submit" [disabled]="!createSongForm.valid">
      Add Song
    </ion-button>
  </form>
</ion-content>
If you’re new to angular forms then here’s what’s going on:
[formGroup]="createSongForm"=> This is the name of the form we’re creating.(submit)="createSong()"=> This tells the form that on submit it should call thecreateSong()function.formControlName=> This is the name of the field.[disabled]="!createSongForm.valid"=> This sets the button to be disabled until the form is valid.
If you try to run your app it’s going to give you an error that says:
Can't bind to 'formGroup' since it isn't a known property of 'form'
You need to open your create.module.ts file and import the ReactiveFormsModule and then add it
to the imports array:
import { FormsModule, ReactiveFormsModule } from '@angular/forms';

@NgModule({
  imports: [
  ...,
  FormsModule,
  ReactiveFormsModule,
  ...,
  ],
})
Now let’s move to the create.page.ts file, in here, we’ll collect the data from our form and pass
it to our service. First, let’s import everything we’ll need:
import { FormGroup, FormBuilder, Validators } from '@angular/forms';
import { LoadingController, AlertController } from '@ionic/angular';
import { FirestoreService } from '../../services/data/firestore.service';
We’re importing:
- Form helper methods from
@angular/forms. - Loading controller to show a loading widget to our users while the form processes the data.
- Alert controller to display an alert to our user if there are any errors.
- And the Firestore service to call the function that will add the song to the database.
Now we need to inject all those services to the constructor and initialize our form:
createSongForm: FormGroup;
constructor(
  private readonly loadingCtrl: LoadingController,
  private readonly alertCtrl: AlertController,
  private firestoreService: FirestoreService,
  formBuilder: FormBuilder,
  private router: Router
) {
  this.createSongForm = formBuilder.group({
    albumName: ['', Validators.required],
    artistName: ['', Validators.required],
    songDescription: ['', Validators.required],
    songName: ['', Validators.required],
  });
}
And now all we need is the function that collects the data and sends it to the service if you
remember the HTML part, we called it createSong()
async createSong() { }
The first thing we want to do inside that function is to trigger a loading component that will let the user know that the data is processing, and after that, we’ll extract all the field data from the form.
async createSong() {
  const loading = await this.loadingCtrl.create();

  const albumName = this.createSongForm.value.albumName;
  const artistName = this.createSongForm.value.artistName;
  const songDescription = this.createSongForm.value.songDescription;
  const songName = this.createSongForm.value.songName;

  return await loading.present();
}
And lastly, we’ll send the data to the service, once the song is successfully created the user should navigate back to the previous page, and if there’s anything wrong while creating it we should display an alert with the error message.
async createSong() {
  const loading = await this.loadingCtrl.create();

  const albumName = this.createSongForm.value.albumName;
  const artistName = this.createSongForm.value.artistName;
  const songDescription = this.createSongForm.value.songDescription;
  const songName = this.createSongForm.value.songName;

  this.firestoreService
    .createSong(albumName, artistName, songDescription, songName)
    .then(
      () => {
        loading.dismiss().then(() => {
          this.router.navigateByUrl('');
        });
      },
      error => {
        loading.dismiss().then(() => {
          console.error(error);
        });
      }
    );

  return await loading.present();
}
NOTE: As a good practice, handle those errors yourself, instead of showing the default error message to the users make sure you do something more user-friendly and use your custom messages, we’re technicians, we know what the error means, most of the time our users won’t.
We almost finish this part, you should be seeing an error becase firestoreService.createSong()
doesnt exists.
So now we have to create the function inside of the service. The function will receive all the form data and store it in the database.
Open firestore.service.ts and let’s do a few things, we need to:
- Import Firestore.
- Import our Song interface.
- Inject firestore in the constructor.
- And write the
createSong()function that takes all the parameters we sent from our form.
import { Injectable } from '@angular/core';
import { Firestore } from '@angular/fire/firestore';
import { Song } from '../../models/song.interface';

@Injectable({
  providedIn: 'root'
})
export class FirestoreService {

  constructor(private readonly firestore: Firestore) {}

  createSong(
    albumName: string,
    artistName: string,
    songDescription: string,
    songName: string
  ): Promise<void> { }
}
The function is taking all of the parameters we’re sending, we’re going to create a reference to that song and set all the properties we have.
createSong(
  albumName: string,
  artistName: string,
  songDescription: string,
  songName: string
): Promise<void> {
  return addDoc(collection(firestore, "songList"), {
    id,
    albumName,
    artistName,
    songDescription,
    songName,
  });
}
We’re creating a reference to the songList collection with collection(firestore, "songList"),
and then we’re pushing the new song document to that collection.
Don’t forget to import both addDoc and collection:
import { collection, addDoc, Firestore } from 'firebase/firestore';
And that’s it. You can add songs to our list. And once each song is created the user will navigate back to the homepage, where we’ll now show the list of songs stored in the database.
Step #3: Show the list of items
To show the list of songs we’ll follow the same approach we used for our last functionality, we’ll create the HTML view, the TypeScript Class, and the function inside the service that communicates with Firebase.
Since we have the service opened from the previous functionality let’s start there, we want to
create a function called getSongList() the function should return a collection of songs:
// Import `collectionData` from Firestore:
import { collectionData, collection, addDoc, Firestore } from '@angular/fire/firestore';
import { Observable } from 'rxjs';

// We create the function:
getSongList(): Observable<Song[]> {
  return collectionData<Song>(collection(this.firestore, 'songList'), {
    idField: 'id';
  });
}
The collectionData() method takes the current Firestore instance and a reference to the collection
we’re looking for. It returns an observable list of the documents that match that query we’re
sending.
The idField property will bring the document’s ID inside of the object.
Now, let’s go to the home page and import everything we’ll need:
import { Component, OnInit } from '@angular/core';
import { Observable } from 'rxjs';
import { FirestoreService } from '../services/data/firestore.service';
import { Song } from '../models/song.interface';
We want the Song interface for a strict type checking, the FirestoreService to communicate with
the database, and Observable also for type checking, our service will return an
AngularFirestoreCollection that we’ll turn into an observable to display on our view.
Then, inside our class we want to create the songList property, we’ll use it to display the songs
in the HTML, and inject the firestore service in the constructor.
@Component({
  selector: 'app-home',
  templateUrl: 'home.page.html',
  styleUrls: ['home.page.scss'],
})
export class HomePage implements OnInit {
  songList: Observable<Song[]> = this.firestoreService.getSongList();
  constructor(
    private firestoreService: FirestoreService
  ) { }

}
Now we can go to home.html and inside the <ion-content> we’ll loop over our list of songs to
display all the songs in the database.
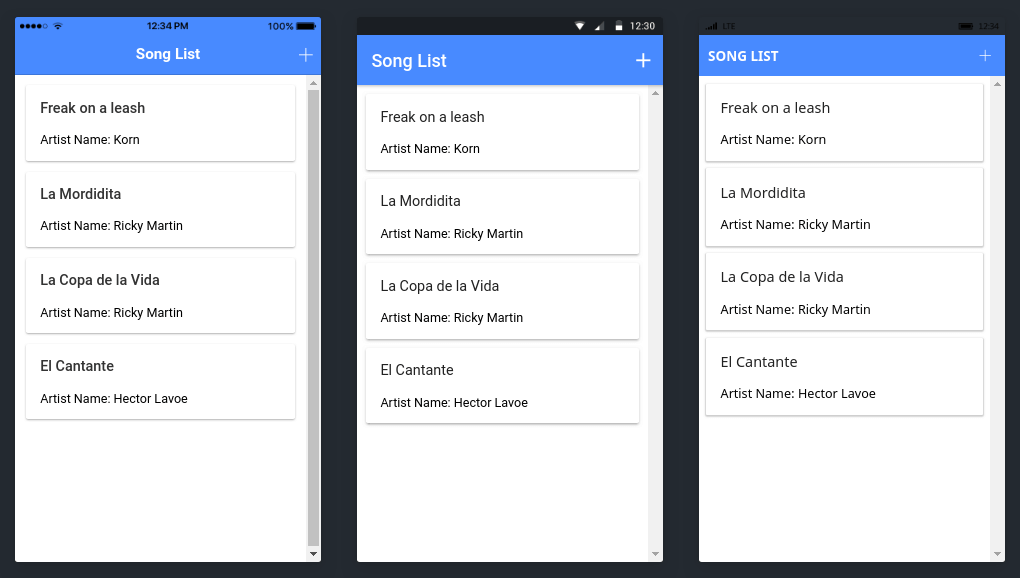
<ion-content class="padding">
  <ion-item *ngFor="let song of songList | async" routerLink="/detail/{{song.id}}">
    <ion-label>
      <h2>{{ song.songName}}</h2>
      <p>Artist Name: {{ song.artistName }}</p>
    </ion-label>
  </ion-item>
</ion-content>
We’re only showing the song’s name and artist’s name, and we’re adding a router link to send the user to the detail page sending the song’s ID through the URL.
For now, grab a cookie or something, you’ve read a lot, and you’re sugar levels might need a boost. See you in a few minutes in the next section :-)
Step #4: Navigate to one item’s detail page
In the previous step, we created a function that takes us to the detail page with the song information, and now we’re going to use that information and display it for the user to see.
We’re passing the song’s ID as a navigation parameter and we’re going to use that ID to fetch the song’s detail from the firestore database.
The first thing we’ll do is go to detail.page.html and create a basic view that displays all the
data we have for our song:
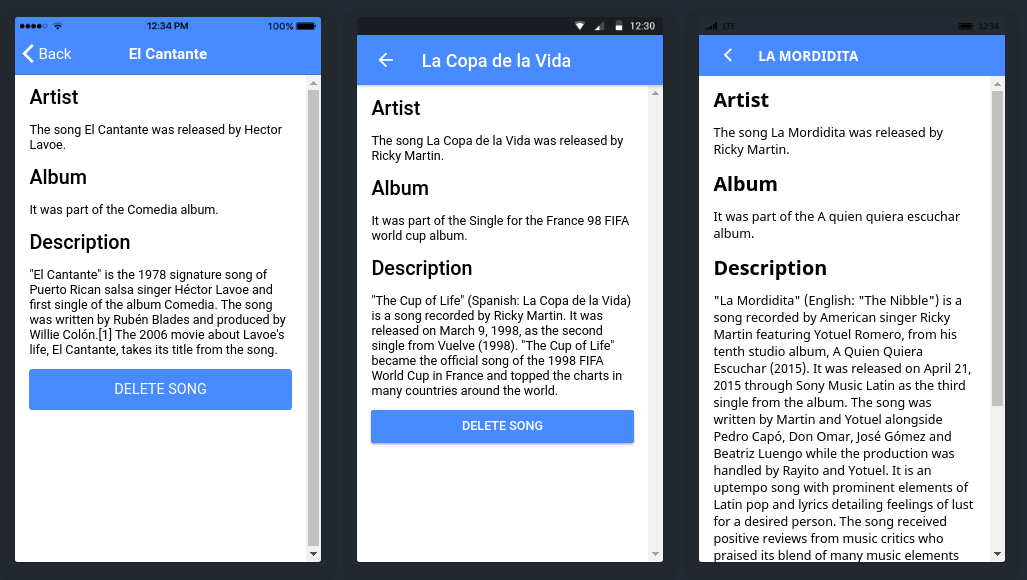
<ion-header>
  <ion-toolbar>
    <ion-buttons slot="start">
      <ion-back-button></ion-back-button>
    </ion-buttons>
    <ion-title>{{ song?.songName }}</ion-title>
  </ion-toolbar>
</ion-header>

<ion-content class="ion-padding">
  <h3>Artist</h3>
  <p>The song {{ song?.songName }} was released by {{ song?.artistName }}.</p>

  <h3>Album</h3>
  <p>It was part of the {{ song?.albumName }} album.</p>

  <h3>Description</h3>
  <p>{{ song?.songDescription }}</p>

  <ion-button expand="block" (click)="deleteSong()"> DELETE SONG </ion-button>
</ion-content>
We’re showing the song’s name in the navigation bar, and then we’re adding the rest of the data to the content of the page.
Now let’s jump into detail.page.ts so we can get song otherwise this will error out.
We need to create a property song of type Song, for that we need to import the Song interface.
Then, you want to get the navigation parameter we sent to the page and assign its value to the
song property you created.
import { Component, OnInit } from '@angular/core';
import { ActivatedRoute, Router } from '@angular/router';
import { Song } from '../../models/song.interface';
import { FirestoreService } from '../../services/data/firestore.service';

@Component({
  selector: 'app-detail',
  templateUrl: './detail.page.html',
  styleUrls: ['./detail.page.scss'],
})
export class DetailPage implements OnInit {
  song: Song;
  constructor(
    private firestoreService: FirestoreService,
    private route: ActivatedRoute
  ) { }

  ngOnInit() {
    const songId: string = this.route.snapshot.paramMap.get('id');
    this.firestoreService.getSongDetail(songId).subscribe(song => {
      this.song = song;
    });
  }
}
For this to work, we need to go to the firestore.service.ts and add the getSongDetail()
function:
import { collectionData, collection, addDoc, Firestore, doc, docData } from '@angular/fire/firestore';
import { Observable } from 'rxjs';

// We create the function:
getSongDetail(songId: string): Observable<Song> {
  const songRef = doc(this.firestore, `songList/${id}`);
  return docData<Song>(songRef, {
    idField: 'id'
  });
}
You should do a test right now running ionic serve your app should be working, and you should be
able to create new songs, show the song list, and enter a song’s detail page.
Step #5: Delete an item from the list
In the last part of the tutorial we’re going to add a button inside the DetailPage, that button will give the user the ability to remove songs from the list.
First, open detail.page.html and create the button, nothing too fancy, a regular button that calls
the remove function will do, set it right before the closing ion content tag.
<ion-button expand="block" (click)="deleteSong(song.id, song.songName)"> DELETE SONG </ion-button>
Now go to the detail.ts and create the deleteSong() function, it should take 2 parameters, the
song’s ID and the song’s name:
async deleteSong(songId: string, songName: string): Promise<void> {}
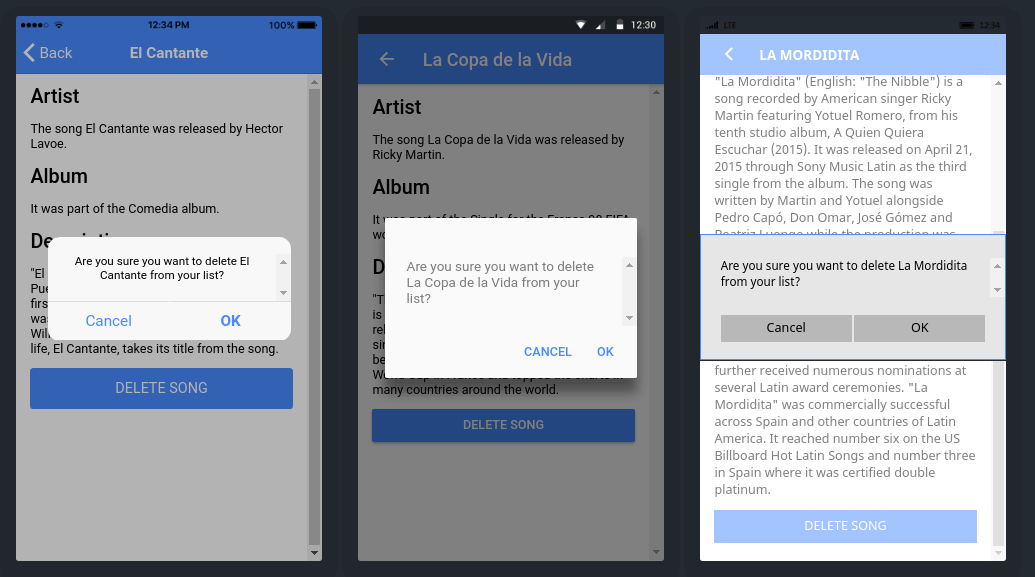
The function should trigger an alert that asks the user for confirmation, and if the user accepts the confirmation, it should call the delete function from the service, and then return to the previous page (Our home page or list page).
For this, we’ll need to first import and inject the alert controller and the router, the alert controller will show the alert, and the router will navigate us to the song list once the song is deleted.
import { Component, OnInit } from '@angular/core';
import { ActivatedRoute, Router } from '@angular/router';
import { Song } from '../../models/song.interface';
import { FirestoreService } from '../../services/data/firestore.service';
import { AlertController } from '@ionic/angular';

@Component({
  selector: 'app-detail',
  templateUrl: './detail.page.html',
  styleUrls: ['./detail.page.scss'],
})
export class DetailPage implements OnInit {
  song: Observable<Song>;
  constructor(
    private firestoreService: FirestoreService,
    private route: ActivatedRoute,
    private alertController: AlertController,
    private router: Router
  ) { }
}
Now, let’s create the delete function:
async deleteSong(songId: string, songName: string): Promise<void> {
  const alert = await this.alertController.create({
    message: `Are you sure you want to delete ${songName}?`,
    buttons: [
      {
        text: 'Cancel',
        role: 'cancel',
        handler: blah => {
          console.log('Confirm Cancel: blah');
        },
      },
      {
        text: 'Okay',
        handler: () => {
          this.firestoreService.deleteSong(this.songId).then(() => {
            this.router.navigateByUrl('');
          });
        },
      },
    ],
  });

  await alert.present();
}
NOTE: Make sure to import AlertController for this to work.
Now, all we need to do is go to our service and create the delete function:
import { ..., deleteDoc } from '@angular/fire/firestore';

deleteSong(songId: string): Promise<void> {
  const songDocRef = doc(this.firestore, `songList/${songId}`);
  return deleteDoc(songDocRef);
}
The function takes the song ID as a parameter and then uses it to create a reference to that
specific document in the database. Lastly, it calls the deleteDoc() method on that document.
And that’s it. You should have a fully functional Master/Detail functionality where you can list objects, create new objects, and delete objects from the database 😁